
Background
Often times many robot projects will require the use of motors to facilitate the movement of either the robot appendages or maybe even the wheels allowing for translation and rotation. A stepper motor can be used as a source for the movement guided by a micro-controller. For this application we used to bipolar two-phase stepper motor with the DRV-8825 stepper motor driver. The motor driver allows us to solely send input from the arduino that dictates the step count, direction, and step-size. The rest is handled by the motor driver which should be properly calibrated for your specific use case.
Getting Started
After recieving your stepper motor it is important to take note of the current per phase and voltage that the motor requires to function properly. In our case the stepper motors required about 2.2 volts each yet they also required 2.1 amps which is quite high and not able to be delivered by a simple 9 volt battery or 5 volt from the arduino pins. Thus, we had to use a 9 V lead acid battery capable of delivering the necceary amount of current to drive our motors.
To calibrate the motor driver current limit, first be positive that everything is connected correctly and that a short will not occur with the lead-acid battery as that is not safe. Follow the minimal wiring diagram here.
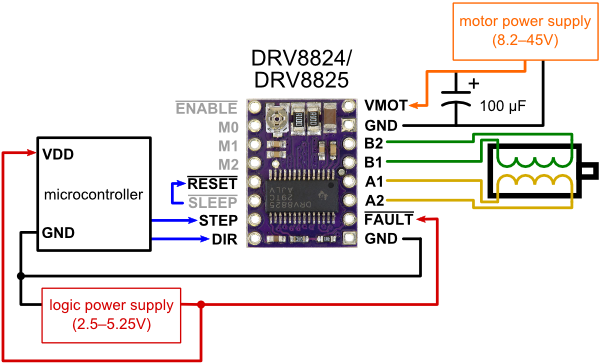
The M0, M1, and M2 are used to dictate the step-size that the user wants to use and they too can be programmed on the fly with arduino. Setting the current limit requires a calculation based on the vref that will be measured.
Current Limit = Vref * 2
Using this equation and assuming your current limit is 2 amps per phase your Vref would be 1 volt. Thus, placing one end of the potentiometer on the ground and the other end on the trim potentiometer it is possible to adjust the vref to 1 volt.
Programming
Now you can begin to program your arduino. The arduino code that I have attached listens on the serial port for commands that are described by “char” values. Theses values are code for the commands to turn right ‘r’, left ‘l’, up ‘u’ , and down ‘d’. There also values to change the step-size from perhaps micro-step to full-step.
The python code that writes to the arduino serial port uses a pygame joystick module to send commands based on the joystick entries. Therefore, the program also includes a GUI that can be useful for debugging.
