
This blog post will talk about the process of creating 2+ custom table views in one view controller using Swift. Currently I am developing an app that requires a view controller to have multiple table views, and each cell in each table needs to have its own unique image and text.
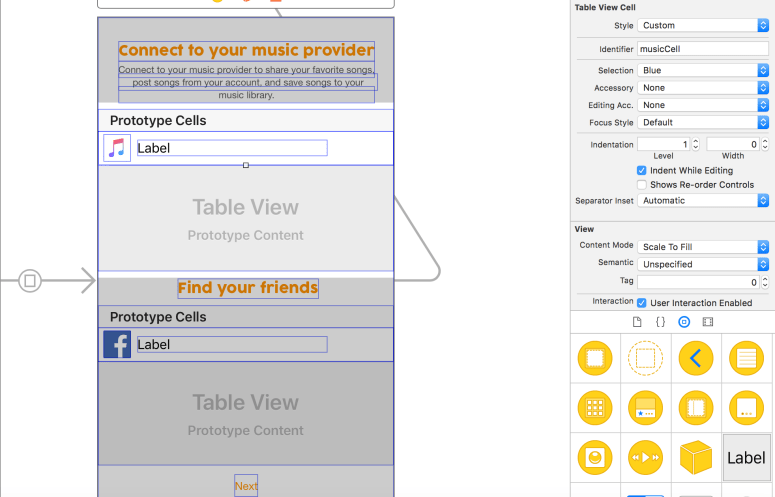
To start, create a new project and in your view controller, add 2 table views (not table view controller) to the view controller. Click on each table view and add one prototype cell. Now click on the actual cell. Set the style to “Custom”, and give the cell a name for “Identifier”. I named mine “musicCell”.
Now create your new view controller file. You only need one view controller file even though you have 2 table views. Once created, your class name will need to look something like this:
class ViewController: UIViewController, UITableViewDelegate, UITableViewDataSource
Make sure to add in the UITableViewDelegate and UITableViewDataSource as this is what allows us to create cells for our table views. Now go back to the storyboard. For each table view, hold control, and drag the tableview up to the yellow button on the top left of the view controller. Select dataSource. Do it again and select delegate.
Go back to the view controller file. Under the class but before the viewDidLoad() function, add in each table view IBOutlets. Here is what I named mine for reference in this post.
@IBOutlet weak var musicProviderView: UITableView!
@IBOutlet weak var socialView: UITableView!
For each table view, create an array to hold the text for each cell, and an array to hold the image for each cell. Since we are creating 2 table views, you should have 4 different arrays.
var providers = ["Apple Music", "Spotify"] //add soundcloud and youtube later
var socials = ["Facebook", "Instagram", "Snapchat", "Twitter"]
var musicIcons = [ imageLiteral(resourceName: "Apple_Music.png"),  imageLiteral(resourceName: "Spotify.png")]
var socialIcons = [ imageLiteral(resourceName: "Facebook.png"),  imageLiteral(resourceName: "Instagram.png"),  imageLiteral(resourceName: "Snapchat.png"),  imageLiteral(resourceName: "Twitter.png")]
Because we are using table views, we need to add in two essential functions.
public func tableView(_ tableView: UITableView, cellForRowAt indexPath: IndexPath) -> UITableViewCell
public func tableView(_ tableView: UITableView, numberOfRowsInSection section: Int) -> Int
The top function returns the data in each cell, and the bottom function returns how many cells are in each table. Since we have 2 different table views, we need to account for both in each function.
To accurately return the number of rows in each table view, our function will need to look something like this:
public func tableView(_ tableView: UITableView, numberOfRowsInSection section: Int) -> Int
{
   if(tableView == musicProviderView){
     return providers.count
   }
   else{
     return socials.count
   }
}
This allows the function to identify how many cells are in each table view.
To accurately return the data for each specific cell, our function will need to look something like this:
public func tableView(_ tableView: UITableView, cellForRowAt indexPath: IndexPath) -> UITableViewCell
{
   if(tableView == musicProviderView){
     var cell = tableView.dequeueReusableCell(withIdentifier: "musicCell", for: indexPath) as! MusicServiceCell
     cell.musicLabel.text = providers[indexPath.row] //to add text to cell
     cell.musicImage.image = musicIcons[indexPath.row] //to add image to cell
     return cell
   }
   else{
     var cell = tableView.dequeueReusableCell(withIdentifier: "socialCell", for: indexPath) as! SocialCell
     cell.socialLabel.text = socials[indexPath.row]
     cell.socialImage.image = socialIcons[indexPath.row]
     return cell
   }
}
Lastly, you will need to create a new swift file to create classes for each type of cell (essentially one class per table view). This file holds the information types for each cell, so in this case I will have the IBOutlet for image and text in each class in this file.
UPDATED: If you do not want to create a new file to implement the cell classes, you can write the class code above the view controller class that you are implementing the tableview in. I have an updated example below.
class SavedTVCell: UITableViewCell{
    @IBOutlet weak var savedLabel: UILabel!
    @IBOutlet weak var savedImage: UIImageView!
}
class PrivateTVCell: UITableViewCell{
    @IBOutlet weak var privateLabel: UILabel!
    @IBOutlet weak var privateSwitch: UISwitch!
}
class StreamingCell: UITableViewCell{
    @IBOutlet weak var streamLabel: UILabel!
    @IBOutlet weak var streamIcon: UIImageView!
    @IBOutlet weak var streamingSwitch: UISwitch!
}
class ConnectCell: UITableViewCell{
    @IBOutlet weak var connectImage: UIImageView!
    @IBOutlet weak var connectLabel: UILabel!
    @IBOutlet weak var connectSwitch: UISwitch!
}
class SettingsViewController: UIViewController, UITableViewDataSource, UITableViewDelegate{
    @IBOutlet weak var myAccountTV: UITableView!
    @IBOutlet weak var streamingTV: UITableView!
    @IBOutlet weak var connectTV: UITableView!

    var providers = ["Apple Music", "Spotify"]
    var musicIcons = [ imageLiteral(resourceName: "Apple_Music.png"),  imageLiteral(resourceName: "Spotify.png")]
    var connect = ["Facebook", "Instagram", "Snapchat", "Twitter"]
    var connectIcons = [ imageLiteral(resourceName: "Facebook.png"),  imageLiteral(resourceName: "Instagram.png"),  imageLiteral(resourceName: "Snapchat.png"),  imageLiteral(resourceName: "Twitter.png")]

    override func viewDidLoad() {
        super.viewDidLoad()
        self.navigationController?.title = "Settings"
        self.navigationController?.tabBarItem.title = "Profile"
        navigationItem.backBarButtonItem = UIBarButtonItem(title: "", style: .plain, target: nil, action: nil)
        self.myAccountTV.dataSource = self
        self.myAccountTV.delegate = self
        self.streamingTV.dataSource = self
        self.streamingTV.delegate = self
        self.connectTV.dataSource = self
        self.connectTV.delegate = self
        // Do any additional setup after loading the view.
    }

    func tableView(_ tableView: UITableView, numberOfRowsInSection section: Int) -> Int
    {
        if(tableView == myAccountTV)
        {
            return 2
        }else if(tableView == streamingTV){
            return providers.count
        }else{
            return connect.count
        }
    }

    func tableView(_ tableView: UITableView, cellForRowAt indexPath: IndexPath) -> UITableViewCell {
        if(tableView == myAccountTV){
            if indexPath.row == 0 {
                let cell = tableView.dequeueReusableCell(withIdentifier: "savedCell") as! SavedTVCell
                cell.savedLabel.text = "Saved Posts"
                cell.savedImage.image = UIImage(named: "star pressed.png")
                //small arrow at the right end of the cell
                cell.accessoryType = .disclosureIndicator
                return cell
            } else {
                let cell = tableView.dequeueReusableCell(withIdentifier: "privateCell") as! PrivateTVCell
                cell.privateLabel.text = "Private Account"
                return cell
            }
        }
        else if(tableView == streamingTV){
            var cell = tableView.dequeueReusableCell(withIdentifier: "streamCell", for: indexPath) as! StreamingCell
            cell.streamLabel.text = providers[indexPath.row]
            cell.streamIcon.image = musicIcons[indexPath.row]
            return cell
        }else{
            var cell = tableView.dequeueReusableCell(withIdentifier: "connectCell", for: indexPath) as! ConnectCell
            cell.connectLabel.text = connect[indexPath.row]
            cell.connectImage.image = connectIcons[indexPath.row]
            return cell
        }
    }
If you prefer to use a separate class file for your cells this is what it should look like.
//
//  connectViewCellFile.swift
//  playlistapp
//
//  Created by Hannah Li on 7/13/18.
//  Copyright © 2018 Hannah Li. All rights reserved.
//
import UIKit
class MusicServiceCell: UITableViewCell
{
    @IBOutlet weak var musicLabel: UILabel!
    @IBOutlet weak var musicImage: UIImageView!
}
class SocialCell: UITableViewCell
{
    @IBOutlet weak var socialLabel: UILabel!
    @IBOutlet weak var socialImage: UIImageView!
}
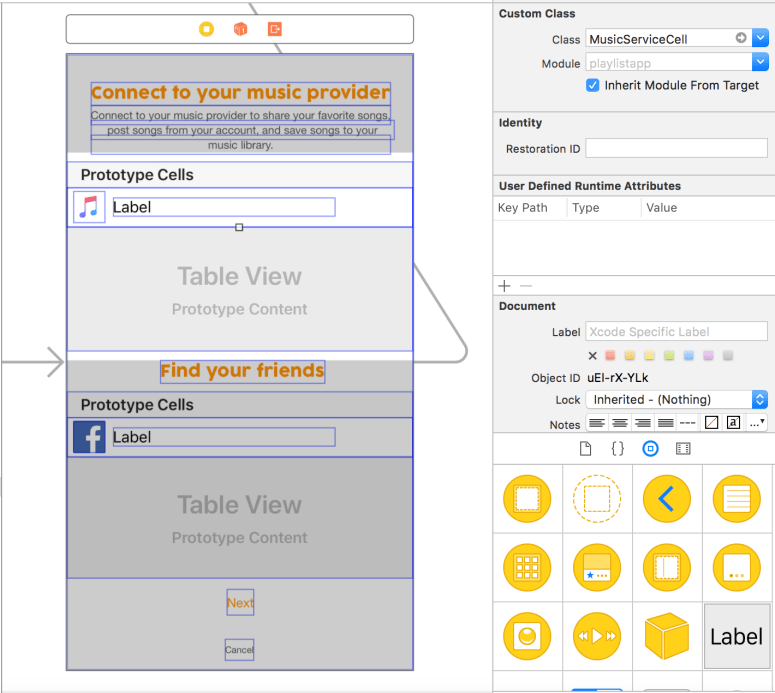
As you can see, each table view’s IBOutlet is on the actual view controller file, but each cell for the table view needs to be added to a separate file. Lastly, go back to the main storyboard and click on the first cell. For each cell, click on the identity inspector and type in the class name that corresponds with the appropriate class. For my example, I named my class MusicServiceCell, so for the musicCell, I chose the class MusicServiceCell in the identity inspector. I did similar for the socialCell. Here is what it looks like in Xcode.
After you have finished all of the above, run your program. This is what the outcome should look like.

